How to Install Rocky Linux 9 {Step by Step} with Screenshots

Are you looking for a new Linux distribution to install? Rocky Linux is an excellent choice, offering a robust and reliable operating system that is compatible with Red Hat Enterprise Linux (RHEL) and it is considered as the replacement of CentOS Linux. As of November 26 2022, Rocky Enterprises Software Foundation has released Rock Linux 9.1, its most latest version of operating system with support for x86–64, aarch64, ppc64le, and s390x processors.
There is some exciting news about Rocky Linux 9.0, namely the introduction of a new reproducible build system called Peridot. Peridot is designed to allow teams, communities, and individuals to customize Rocky Linux builds according to their unique needs.
As usual, the support lifecycle for Rocky LInux is ten years. Since the Rocky Linux 9 was released on July 14 2022 and the end of life date is May 31 2032. In version 9.1 there are quite a few updates and changes that have been added.
In this section I will be listing out only the main features of the latest Rocky Linux versions. However, you can read the full release notes from here.
Main features:
GNOME 40 has been adopted as the default desktop environment.
The base OS XFS file system now supports Direct Access Operations (DAX).
Runtime and Tools — This version of the product includes the latest language runtimes and compilers, including GCC 11.2.1, Go (1.17.1), Rust (1.58.1), and LLVM (13.0.1). In addition, it comes with the latest Python 3.9, Node.JS 16, Ruby 3.0.3, PHP 8.0, and Perl 5.32.
Remote root user authentication is disabled by default, so SHA-1 is no longer used for security. There have been a number of improvements made to the security of OpenSSL v3.0.1 with the new version. In addition, the SCP/RCP protocol was replaced with SFTP.
The Cockpit Web Console now offers improved performance and features for system monitoring
With this guide, you will be able to install Rocky Linux 9.1 in just seven easy steps. By following these simple linux installation steps, you will have Rocky Linux 9.1 up and running on your computer in no time. Let’s get started and learn how to install Rocky Linux 9.1. Nevertheless, Rocky Linux 8 will continue to be supported until May 31 2029.
Prerequisites :
HDD minimum : 20 GB
RAM minimum : 2 GB (Recommended 4 GB)
System Type : 64-bit x86 System
Installation kit : Bootable DVD/USB/.iso
Note:
A virtual environment (VMware Workstation 17 pro) will be used for the demonstration. We assume that you have your own virtual or standard machine that is ready to install Rocky Linux 9.1.
Step-1: Download the latest Rocky Linux 9.1
Download Rocky Linux 9.1
Rocky Linux’s official site provides a direct download link for the iso file.
Step-2: Bootable DVD/USB
Note:
If you plan to install the OS on a virtual machine, use the ISO image instead of the bootable DVD or USB drive. For our environment, we chose a virtualized environment. Installing the bare metal server requires a bootable DVD or USB drive. In case of difficulty, refer to this step-by-step guide on creating a bootable USB.
Step-3: Let’s start the Rocky Linux 9.1 Installation
Note:
Upon booting Rocky Linux 9.1 from the “.ISO or bootable media kit”, you will be presented with the following screen: In order to install Rocky Linux 9, simply select “Install Rocky Linux 9.1” or “Test this media & Install Rocky Linux 9.1” and hit enter. As a first-time downloader, you should pick the second option.

Step-4: Language selection screen
Note:
This screen allows you to choose your preferred language. In order to proceed, let’s choose the English United States from the list and click “Continue”.

Step-5: Configure Installation Summary
Note:
Here you are able to customize the installation according to your needs.

- System (Installation Destination)
- Activate Root Password
- Create a local user
- Date & Time
- Software Selection
- Kdump
- Network & Host Name
- Security Policy
Note:
It can be seen in the screen above that some options have already been selected or filled by default. The remaining options above will be manually configured according to our needs. Here, I will customize the partition (Installation Destination).

Note:
As seen in the above window, Rocky Linux 9.1 will be installed on a 20GB virtual disk. The disk partition can be created in two ways (Automatic and Custom). In the Automatic option, all partitions will be configured automatically. If you select the “Custom option”, you will be able to configure partitions manually. I have decided to create a custom partition based on my needs. Click “Done” to continue.

Note:
On the screen above, you can select between Standard, LVM, and LVM Thin Provisioning partitioning schemes. LVM is enabled by default. To change the scheme, select an option from the drop-down list. As you can see, I used standard partitioning here.

Note:
It is essential for every Linux administrator to understand how to partition the disk. For the server to function properly, we must create a partition very carefully. Partition schemes are often chosen incorrectly by newbies and experienced Windows users migrating to Linux. They typically create boot, swap, and root (/) partitions. Maybe this combination would work well for a desktop or home computer. Production servers should not be able to use it due to performance and other issues. Rather than using the previous partitioning scheme, use the following one:
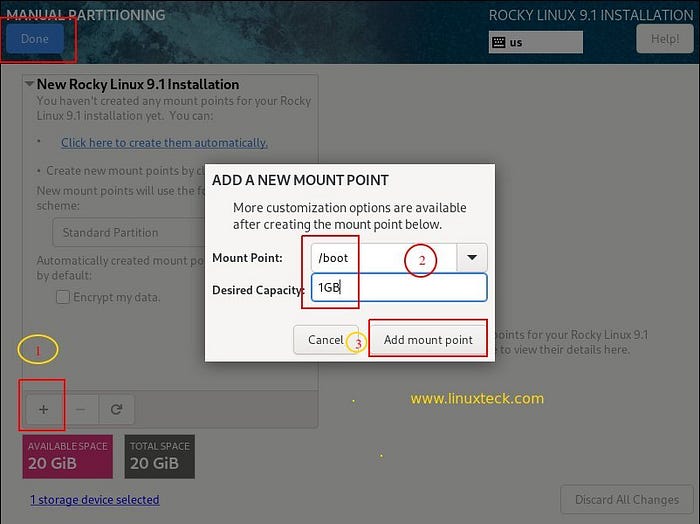
- /boot — 1 GB with xfs filesystem
- / — 8 GB with xfs filesystem
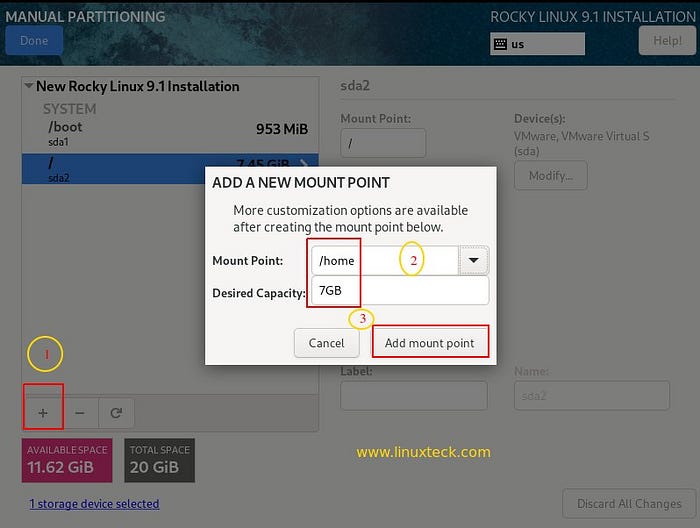
- /home — 7 GB with xfs filesystem
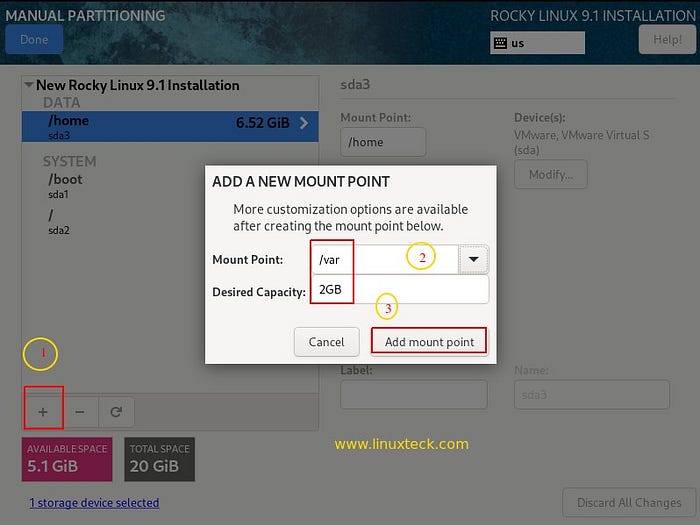
- /var — 2 GB with xfs filesystem
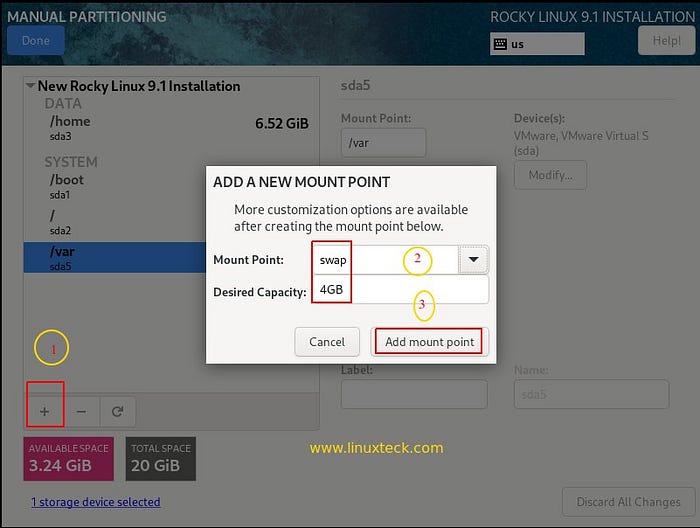
- Swap — 4 GB with swap filesystem
Note:
In my boot partition, I have made 1GB. The boot partition can be customized to any size you like. Usually, 1 to 2 GB is sufficient. The final step is to click “Add mount points”.
Note:
In the next step, create a partition called “/” (parent), also known as “root”. I’m going to use an 8GB partition for this lab exercise. Continue by clicking “Add mount point”.

Note:
A similar process can be used to create other partitions (/home, /var, and swap).
Note:
Click “Done” after you’ve finished partitioning the disk as shown below:

Note:
In order to fulfill the summary changes made to the disk, click “Accept Changes”, which will write the following partitions:

Note:
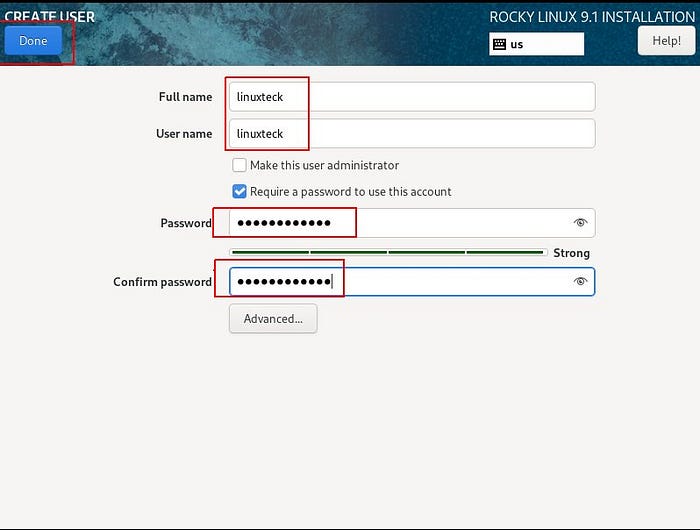
Then, under User Settings, you need to enable both Root and User creation. To enable the root account, simply click this option, enter the root password, and click “Done”. As you move forward with the next step, you will see two checkboxes where you can mark what’s important to you and click “Done”.

Note:
Once you’ve entered your root password, click “Done”.

Note:
You can create a new user by clicking “User Creation” on the Installation Summary page.

Note:
To adjust the Date and Time settings for your zone, click on the respective icon and select the region and city displayed as shown below:

Note:
The next step is to review the server software packages. During the installation process, Rocky Linux is automatically selected as a “Server with GUI” package, but you can change this selection by clicking the “Software Selection” option. There are six options for server software your can choose from. You can choose based on your requirements. Currently, I will use the default. Once you have selected your method, click “Done.”

Note:
Next, let’s look at Kdump. By default, Kdump is enabled, and it is a good idea to leave it enabled for debugging kernel-level crashes. You can disable it by clicking the option and removing the tick mark. You can learn more about the kdump by clicking here.

Note:
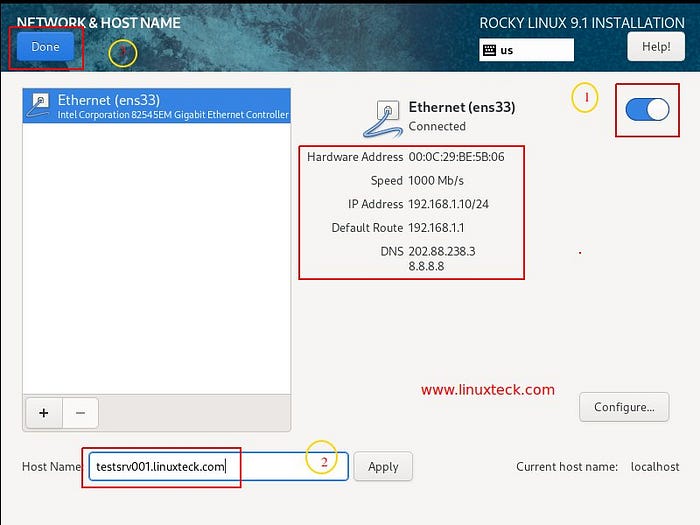
During the installation process, you can enable the Ethernet connection “On” and configure “Network & Host Name”. A dynamic IP address (DHCP) is assigned automatically, and the hostname can also be added. Once you’ve finished, click “Done”:
Step-6: Click “Begin Installation”
Note:
Following our customization of all the relevant options, you can click on the “Begin Installation” tab to begin the installation:

Note:
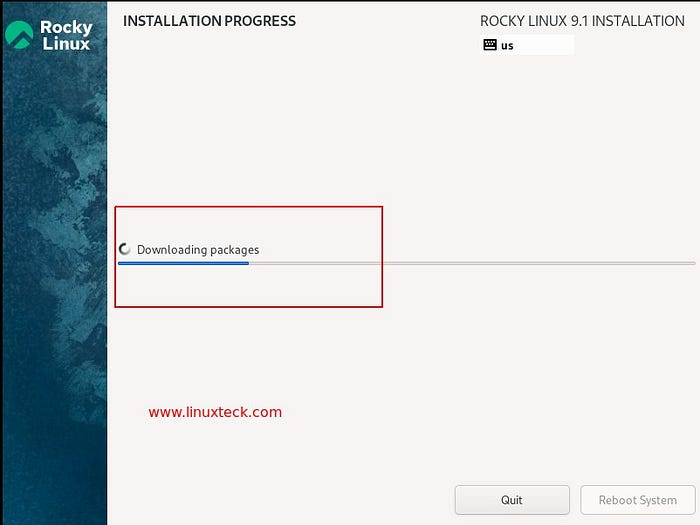
In the below screenshot, you can see that the installation has begun, as well as the level of progress of the installation.


Note:
Reboot the computer and choose the boot option from the disk after removing the installation media kit.
Step-7: Fresh Rocky Linux 9.1 box and Post Installation
Note:
Start Rocky Linux 9.1 by selecting the first option from the grub menu, as shown below.

Note:
After clicking on the username tab, enter the password and click “ENTER” to log in.

Note:
This displays the Rocky Linux 9 GNOME desktop with a tour guide to help you learn how to use it. Tours can be taken or declined. You are completely free to choose.

Note:
Finally, here is a screenshot of Rocky Linux 9.1’s GNOME environment desktop. The menu bar is located in the bottom corner of your screen.

Conclusion
We have successfully installed Rocky Linux 9.1! Thank you for taking the time to read! We hope this article has helped you understand the installation process. Drop me your feedback/comments. Feel free to share this article with others if you like it.
Thank you!
To find all the RHEL / CentOS 7 articles, click here.
