How to configure iSCSI target & initiator on RHEL/CentOS 7.6

This article will help you how to setup/configure iSCSI on Linux/Unix based systems. iSCSI stands for (Internet Small Computer System Interface), it is an Industry standard protocol which is mainly used to share the storage device over the TCP/IP layer. Unlike Samba or NFS which work on file system level whereas iSCSI works only on the block-level device. Mostly block-level storage devices having a capability that builts in work to share the data across the volume.
Advantages of using block-level storage?
Lowest possible latency
High performance of IOPS
Highly redundant
iSCSI handles client-server architecture. It uses iSCSI components to communicate with each other. For Client, it uses “initiators” and for Server, it uses “targets”.
iSCSI Target: It is also known as iSCSI Server which is responsible to export the disk/block device to the iSCSI initiator/client. We can create multiple targets in iSCSI Server and each target has its unique ID. We can also attach one or more LUNs to each target. In each LUNs has its back device attached to it and that device is the actual file that is exported and will be visible to the iSCSI initiator. It could be either a disk or a disk partition, LVM, Raid or a file. It uses the iscsi protocol to interact with the clients using the IP network. It provides security features like Authentication, Network, etc.
iSCSI Initiator: It is also known as iSCSI Client which is responsible to import the LUNs which are exported by the iSCSI target/server. Once the client application is connected to the server, then it will send the ISCSI commands to the iscsi server over the IP network.
This step by step guide will help you how to configure iSCSI target and initiator on RHEL/CentOS 7.6 Linux. This guide is fair enough to work for all the versions of RHEL/CentOS/Fedora with a few minimal changes in commands.
Table of Contents hide
Step1: Setup iSCSI Target/Server
Step2: Setup iSCSI Initiator/Client
Prerequisites :
Operating System: CentOS Linux 7
IP Address : For Server and For Client
Package : targetcli (Server) and iscsi-initiator-utils (Client)
Port : 3260
Block device : /dev/sdb or /dev/sdc ..
My Lab Setup :
For the Lab setup, I am using 2 centos machines. One for iSCSI Server/ Target and the other for iSCSI initiator /Client
iSCSI-Server:-
Operating System: CentOS Linux 7 (Core)
hostname: iscsi-server.local
IP Address: 192.168.3.101
Block device : /dev/sdbiSCSI-Client:-
Operating System: CentOS Linux 7 (Core)
hostname: iscsi-client.local
IP Address: 192.168.3.102
Follow the steps to configure/setup iSCSI Target on RHEL / Centos-7.
Before starting the process, we need to confirm the available disk to use as an iSCSI Target Server.
# lsblk or # sfdisk -s (Use either one of the command )
Output:
NAME MAJ:MIN RM SIZE RO TYPE MOUNTPOINT
sda 8:0 0 20G 0 disk
├─sda1 8:1 0 500M 0 part /boot
├─sda2 8:2 0 3.9G 0 part [SWAP]
└─sda3 8:3 0 15.6G 0 part /
sdb 8:16 0 1G 0 disk ← — — -
sr0 11:0 1 4.1G 0 rom /run/media/john/CentOS 7 x86_64
Note: The above command will list the details about all the available or the particular block devices in a tree format. The output shows, now the iSCSI Target Server has 2 block-devices “/dev/sda and /dev/sdb”. The /dev/sda is already been used for server OS and another application and /dev/sdb is available to use as shared storage for iscsi.
Step1: Setup iSCSI Target/Server
First, let’s update the latest current version of the package.
# yum update -y
Install the target utility package using the following command:
# yum install -y targetcli
Once you have successfully installed the package, then enter the following command to get the interactive shell of the iSCSI target. There you can edit, list and save the configuration file. It is a “.jason” format. The targetcli layout of the filesystems is in a hierarchical structure.
# targetcli
targetcli shell version 2.1.fb49
Copyright 2011–2013 by Datera, Inc and others.
For help on commands, type ‘help’./>
Note: In the above interactive shell you can hit ‘help’ command to list all the available options. Now we use the ‘ls’ command to list out the available configuration objects.
/> ls

In the above output, you can see there are 3 options under ‘/’ which are “backstores, iscsi, and loopback”. Under “backstores” there are 4 sub-options which are “block, fileio, pscsi, and ramdisk”. A short explanation is given below of the above “options and sub-options”:
backstores → It is a kind of local storage or a partition that you need to access as storage object
which defines the backstore use. It could be either a block device or LVM or a file.block → Present local block disk (/dev/sdb or /sdc)
fileio → Present normal files to be treated as disk
pscsi → Present a local SCSI device
ramdisk → Present kernel memory as block SCSI deviceiscsi → It is mainly used to all the configuration like who can access this LUN and how many LUNs can bee attached and their ACLs (Access Control List)
loopback → It is nothing but a fabric module.
Note: In backstores we generally use only two sub-options ie., block or fileio. The rest is not so frequent. In our LAB exercise, I will use the first two options only.
In the interactive shell, you can use the TAB completion to fills in partially typed commands or objects path.
Lets start the configuration part:
(a) Create a backstore block device:
Option 1:
/> /backstores/block create ltecklun1 /dev/sdb
Output:
Created block storage object ltecklun1 using /dev/sdb.
— — — → OR ← — — — -
Option 2:
/> backstores/fileio/ create shareddata /opt/ltecklun1.img 1024M
Output:
Created fileio shareddata with size 1073741824
Note: Using the 1st option, we can create a block type backing-store for the storage-object named as “ltecklun1” with an attached block device “/dev/sdb”. Use ‘ls’ command to see the list as below:
/> ls
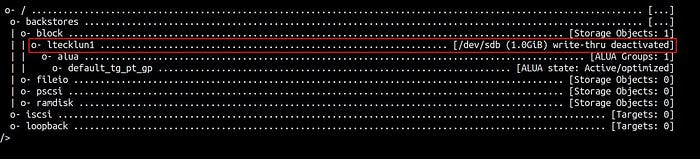
Note: As the above output shows, you have created a LUN named “ltecklun1” with the backed device of “/dev/sdb” in a hierarchy format.
(b) Create iSCSI for IQN target:
/> /iscsi create iqn.2020–01.local.server-iscsi:server
Note: Using the above command we can create a custom made ‘iqn’ for iSCSI target. Alternatively, we can just execute “create command” i.e. (/> /iscsi create) without any arguments and it will create a default iSCSI iqn and target name. Use ‘ls’ command to see the list as below:
/> ls

Note: The above output shows, 3 objects had been defined under TPG1 which are “acls, luns, and portals”. Under the portals, you can see the IPv4 interfaces with TCP port of ‘0.0.0.0:3260’ as created automatically.
From RHEL 7.2 version onwards the default portal configuration has done automatically, whereas the previous of RHELs like version “7.0 and 7.1” we need to manually configure the default portal settings to listen to the TCP port of “3260 on 0.0.0.0” after the target configuration has been set.
Here is a short explanation about iSCSI component terminology:
IQN → (iSCSI Qualified Name: Worldwide unique identification name for both targets and initiators. The naming format of IQN is “iqn.yyyy-mm.naming-authority:unique-name”)
yyyy-mm → the year and month. You can use either the current date or establishment date of your naming authority.
naming-authority → Means your organization authority name/internet domain name. The syntax used in the form of reverse order eg: com.domainname
unique-name → we can use any name, it is just for the identification.ACLs → (Access Control Lists: to provide access permissions using iQN)
LUNs → (Logical Unit Number: it is a block device to attach. One or more LUNs can be attached in a single target)
Portals → (Mainly used to configure the IP address and TCP port on either a target of initiator to establish the connections)
© Create ACLs:
/> /iscsi/iqn.2020–01.local.server-iscsi:server/tpg1/acls create iqn.2020–01.local.client-iscsi:client1
Note: The above command would permit the client to access the LUN which is based on the client’s iQN. Don’t forget to use the same iQN name to configure the initiator/client name. If there is any mismatch of iQN, then the client won’t able to communicate to the Server. Use ‘ls’ command to see the list as below:
/> ls

(d) Create LUNs under the ISCSI target:
/> /iscsi/iqn.2020–01.local.server-iscsi:server/tpg1/luns create /backstores/block/ltecklun1
Output:
Created LUN 0.
Created LUN 0->0 mapping in node ACL iqn.2020–01.local.client-iscsi:client1
Note: Using the above command we can associate the block device with a particular Target Portal Group (TPG). In our case, we will be using the backing storage object which has created above “/backstores/block/ltecklun1” to present to the LUN directory under TPG1. Use ‘ls’ command to see the list as below:
/> ls

(d) Two optional choices:
Note: CHAP Authentication and using the specific IP address on Portal. It is completely the discretion of your choice. In this article, we will use both optional services as additional security.
Option 1: CHAPP Authentication
This is an additional layer of security to exchange communication between the server and the client. It is widely supported authentication terminology to exchange the password between the Server-Client communication. Follow the steps to configure :
⇒ Change the directory into tpg1
/> cd /iscsi/iqn.2020–01.local.server-iscsi:server/tpg1
⇒ Change the value of attribute authentication into ‘1’, means it will disable all the corresponding endpoint, else it will granted open access to all the initiators.
/iscsi/iqn.20…i:server/tpg1> set attribute authentication=1
⇒ To cross-check the attribute auth status.
/iscsi/iqn.20…i:server/tpg1> get attribute authentication
Output:
authentication=1
⇒ Change the directory to iSCSI Node ACL
/iscsi/iqn.20…i:server/tpg1> cd acls/iqn.2020–01.local.client-iscsi:client1
⇒ Execute user-id command to setup for CHAP authentication for iscsi initiator
/iscsi/iqn.20…iscsi:client1> set auth userid=linuxteck
⇒ Execute the command to create a password for the above user-id
/iscsi/iqn.20…iscsi:client1> set auth password=password@123
⇒ To get verify the above-executed credentials
/iscsi/iqn.20…iscsi:client1> get auth
Output:
AUTH CONFIG GROUP
=================
mutual_password=
— — — — — — — —
The mutual_password auth parameter.mutual_userid=
— — — — — — —
The mutual_userid auth parameter.password=password@123
— — — — — — — — — — -
The password auth parameter.userid=linuxteck
— — — — — — — —
The user-id auth parameter.
Note: After verifying the above credentials, use ‘ls’ command to confirm whether this LUN is marked as “1-way auth” as like the following output:
/iscsi/iqn.20…iscsi:client1> ls
o- iqn.2020–01.local.client-iscsi:client1 …………………………………………………. [1-way auth, Mapped LUNs: 1]
o- mapped_lun0 ……………………………………………………………………………………………. [lun0 block/ltecklun1 (rw)]
⇒ Now move back to the root directory and execute saveconfig and exit
/iscsi/iqn.20…iscsi:client1> cd /
/> saveconfig
/> exit
⇒ Restart the target service and check the status
# systemctl restart target.service
# systemctl status target.service
Option 2: Create a specific IP address on Portal
/> cd /iscsi/iqn.2020–01.local.server-iscsi:server/tpg1/portals/
/iscsi/iqn.20…/tpg1/portals> create 192.168.3.102
Output:
Using default IP port 3260
Could not create NetworkPortal in configFS
Note: You will notify by an error mentioned above “Could not create NetworkPortal in configFS”. The reason being if any default portal (0.0.0.0:3260) exists, then it will not allow you to create any new portal, hence you need to delete the default/old portal and create the new portal as using the following commands:
(i) Delete the default portal interface which is 0.0.0.0:3260
/> cd /iscsi/iqn.2020–01.local.server-iscsi:server/tpg1/portals/
/iscsi/iqn.20…/tpg1/portals> delete 0.0.0.0 ip_port=3260
Output:
Deleted network portal 0.0.0.0:3260
(2) Create a new portal with a specific IP address of iSCSI target
/iscsi/iqn.20…/tpg1/portals> create 192.168.3.101
Output:
Using default IP port 3260
Created network portal 192.168.3.102:3260.
(3) Use ‘ls’ command to see the list as below:
/iscsi/iqn.20…/tpg1/portals> ls
o- portals ………………………………………………………….. [Portals: 1]
o- 192.168.3.102:3260 ………………………………………………… [OK]
(4) Now go back to the root directory of targetcli shell ‘cd /’ and execute ‘saveconfig’ command to save all the target configuration. This file will be saved in a “.json format” and exit.
/> saveconfig
Output:
Configuration saved to /etc/target/saveconfig.json
/> exit
Output:
Global pref auto_save_on_exit=true
Last 10 configs saved in /etc/target/backup/.
Configuration saved to /etc/target/saveconfig.json
Use the following command to check whether the TCP port 3260 is open or not
# ss -na | grep 3260
tcp LISTEN 0 256 192.168.3.102:3260 *:*
# netstat -tnlp | grep 3260
tcp 0 0 192.168.3.102:3260 0.0.0.0:* LISTEN -
Note: The ‘ss’ utility is similar to netstat, but it can print more information than other tools. It is confirmed now the port 3260 is opened with our given IP address.
Use the following command to open Firewall ports on iSCSI target (3260) services OR simply disable the Firewall.
# firewall-cmd — permanent — add-port=3260/tcp
# firewall-cmd — reload
# firewall-cmd — list-all
OR
# systemctl disable firewalld.service
# systemctl stop firewalld.service
Disable the SELinux or click here to configure SELinux for iSCSI target.
Finally, start the iSCSI target and enable it for every reboot.
# systemctl enable target.service
# systemctl restart target.service
# systemctl status target.service
Step2: Setup iSCSI Initiator/Client
(a) First, let’s update the latest current version of the package.
# yum update -y
(b) Install the target utility package using the following command
# yum install -y iscsi-initiator-utils
Note: Once you have successfully installed the package, then edit iscsi-initiator configuration file “/etc/iscsi/initiatorname.iscsi” and add the initiator name. In our case, we have already created during the Target configuration, use the same iqn here ( iqn.2020–01.local.client-iscsi:client1 ) and restart service.
# vi /etc/iscsi/initiatorname.iscsi
InitiatorName=iqn.2020–01.local.client-iscsi:client1
Save the file and restart the iscsid service.
# systemctl restart iscsid.service
# systemctl enable iscsid.service
# systemctl status iscsid.service
© Configure CHAP Authentication
Edit the “iscsid” configuration file and enabled/uncomment line number 57 for “CHAP” authmethod and uncomment following lines also 61 and 62 for (“node.session.auth.username = username and node.session.auth.password = password”) in Centos-7.
# vi /etc/iscsi/iscsid.conf
node.session.auth.authmethod = CHAP
node.session.auth.username = linuxteck
node.session.auth.password = password@123
Save and Exit:
(d) Discover iSCSI Targets/Server (LUNs):
Follow ‘iscsiadm’ command to perform discovery and login to iSCSI Targets. Basically, it comes with the combination of three different arguments which are “discover, portal, send targets type”.
(i) We need to discover the target by executing the following command. Here the IP address is for your target server:
# iscsiadm — mode discoverydb — type sendtargets — portal 192.168.3.101 — discover
Output:
192.168.3.101:3260,1 iqn.2020–01.local.server-iscsi:server
Note: It will show you the available iQNs of the target server. Next, you can attempt to log-in. If you face any errors relates to authentication, then you can check your CHAP settings of your iscsi initatior.
(ii) # iscsiadm -m node — login
Output:
Logging in to [iface: default, target: iqn.2020–01.local.server-iscsi:server, portal: 192.168.3.101,3260] (multiple)
Login to [iface: default, target: iqn.2020–01.local.server-iscsi:server, portal: 192.168.3.101,3260] successful.
Note: Once you have login successfully without any error. Next, check the session and the node.
(iii) # iscsiadm -m session -o show
Output:
tcp: [1] 192.168.3.101:3260,1 iqn.2020–01.local.server-iscsi:server (non-flash)# iscsiadm — mode node -P 1
Output:
Target: iqn.2020–01.local.server-iscsi:server
Portal: 192.168.3.101:3260,1
Iface Name: default
(iv) Use the following command to check the newly added disk into iscsi initatior:
# lsblk or # sfdisk -s
Output:
NAME MAJ:MIN RM SIZE RO TYPE MOUNTPOINT
sda 8:0 0 20G 0 disk
├─sda1 8:1 0 500M 0 part /boot
├─sda2 8:2 0 3.9G 0 part [SWAP]
└─sda3 8:3 0 15.6G 0 part /
sdb 8:16 0 1G 0 disk ← — — -
Note: The above output list the newly added disk drive “sdb” 1GB volume which is shared from the target server.
(e) Mount the Disk Drive (/dev/sdb)
(i) First, use the following command to create a filesystem on newly added iscsi device ‘/dev/sdb’.
# mkfs.xfs /dev/sdb

Note: The “xfs” filesystem has been created successfully. “.xfs” format is a highly scalable and high-performance file system in centos/rhel7.
(ii) Create a new Mount Point for ‘/dev/sdb’ block device
# mount /dev/sdb /mnt
# df -HT

Note: Now the iscsi disk can be mounted on the client’s machine, but the mount point will be last only on a temporary basis, which means once you have reboot the client machine the mount point will disappear. In order to avoid this issue, we need to make it as an automount, so that it will be mounted permanently for every reboot.
To do so, add an entry into ‘/etc/fstab’, it is a system configuration file. it will handle all the mount points and the related options.
(iii) Use the following command to create a new mount point and get the UUID of iSCSI disk
# mkdir /mnt/ltecklun1
# blkid /dev/sdb
Output:
/dev/sdb: UUID=”f89efb1b-b02b-4d52–8d54–38567c61efc9" TYPE=”xfs”
(iv) Now, add the above UUID entry into ‘/etc/fstab’:
# vi /etc/fstab
UUID=f89efb1b-b02b-4d52–8d54–38567c61efc9 /mnt/ltecklun1 xfs defaults 0 0
save and exit
(v) Mount the iSCSI drive:
# mount /mnt/ltecklun1 OR # mount -a (It will activate all the mount points)
(vi) check the mount points :
# df -HT

Note: You can see above “/dev/sdb” is mounted now with the mount point of /mnt/ltecklun1.
(f) How to detach iSCSI storage
Use the following steps, in case if you want to remove an iSCSI storage from a client:
(i) # unmount /mnt/ltecklun1
(ii) # iscsiadm — mode node — targetname iqn.2020–01.local.server-iscsi:server — portal 192.168.3.101:3260 — logout
Output:
Logging out of session [sid: 1, target: iqn.2020–01.local.server-iscsi:server, portal: 192.168.3.101,3260]
Logout of [sid: 1, target: iqn.2020–01.local.server-iscsi:server, portal: 192.168.3.101,3260] successful.
Note: Now you have successfully logout from the client machine.
Congratulations, you have successfully configured an iSCSI target (server) and shared a block device to an iSCSI initiator (client) on RHEL/CentOS 7.6.
