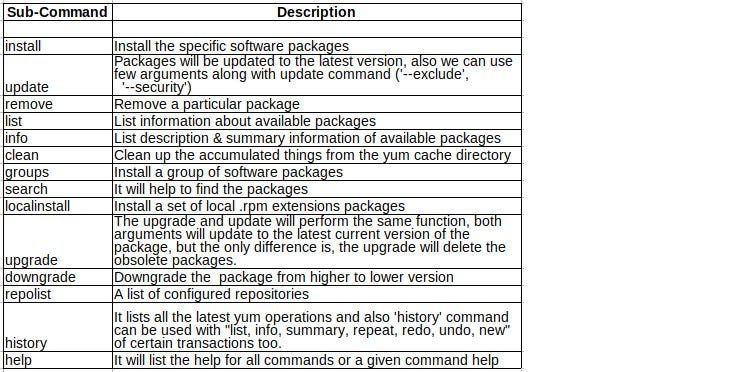
15 useful YUM commands for Beginners

YUM stands for Yellowdog Updater Modified, it is RPM (RedHat Package Manager) based package management tool for Linux Systems. Yum was introduced in RHEL version 5.10 onward and its deprecated ‘up2date’ command. Yum, command helps all the Users and System Administrators to search the information about packages and then install, update, and remove all the rpm related files from systems. The advantage of using YUM will be automatically performing the dependency resolutions in a single command, even its supports to install the packages from various 3rd party repositories without any issue of dependencies. Yum was developed and released under GPL (General Public License), which means it comes under free software licenses that permit the end-user to modify the source code of the software.
The main configuration file of YUM is located at “/etc/yum.conf” and the .repo extensions are stored at “/etc/yum.repos.d” directory. By using the ‘yum command’ we can install all the packages directly from the internet, also we can set up a local yum repository by using the .iso or DVD. Using the local repository will help us to do a bulk update/patching the systems in the network and it saves a good amount of Internet bandwidth. The yum utility is a big relief on all types of .rpm based software dependency issues and it helps all the installers to speed-up the package management related tasks.
Note:
On RHEL / CentOS 8 comes with the updated version (v4.0.4) of the YUM package manager, which is named as DNF (Dandified Yum). DNF was introduced in Fedora 18 initially and now it is the default package manager on Fedora 22 and RHEL 8.
In this article we will see the most used 15 yum commands, it will help to all the newbies and System Administrators for their day today activities. All the below examples of ‘yum’ commands are tested on RHEL and CentOS 7.8.
Prerequisites :
Operating System : CentOS/ RHEL
User account : root user or user account with sudo privileges
Recommended to run all the administrative command as with sudo privilege instead of root
The Global Syntax of yum command in Linux:
yum [options] [command] [package …]
The following table provides an overview of the options of ‘yum’ command in RHEL / CentOS
1. How to check any packages available for update?
$ sudo yum check-update

Note:
Using the above command we can see (if there are any available) packages from the enabled repositories for an update. It is always recommended the installers should examine and verify the list of available packages before blindly execute the ‘update’ sub-command to update your system, as sometimes the new updates /patches may not be compatible with your existing applications or hardware. In the above output I have not added the full list, as it has almost 116 packages are available to update, however a screenshot with only a few lines to give you an idea about it. Add ‘wc -l’ to get the total count of the available packages (like ‘yum check-update | wc -l).
2. How to install a particular package?
$ sudo yum install vsftpd

Note:
I have used the above command to install a particular package “vsftpd”, once you have executed the command it will ask you for confirmation and enter ‘y’ to proceed with the installation. Also, we can install the package without confirmation by using ‘-y’ at the end of the above command.
3. How to update a particular package?
$ sudo yum update vsftpd -y
Note:
Let’s take the same “vsftpd” package, as we know this package already exists in the system. After a couple of days you will be notified by the release of the new updates. This time I just want to update only a particular package, in our example “vsftpd” by using the above command we can update only the concern package from the whole bunch of new releases. To update the entire system just use the following command.
$ sudo yum update -y
4. How to exclude a particular package while updating the whole system?
Note:
For a better understanding, first let me show you a list of all the available packages to update using the following command. From this list we can pick a particular package to exclude. To add the line numbers in the following list, I have used the ‘cat ‘ command with the ‘-n’ option. If you want to know more about cat commands in Linux click here
$ sudo yum list updates | cat -n

Note:
In this example I have selected the “device-mapper” package which is the 15th number on the above list to exclude while updating the whole system. This can be done by using one of the following command.
$ sudo yum update — exclude=device-mapper\* OR $ sudo yum -x “package_name*” update
Note:
To exclude more than one (multi) packages in a single command, use one of the following commands.
$ sudo yum update — exclude=device-mapper\* — exclude=PackageKit\* OR
$ sudo yum -x “package_name1*” -x “package_name2*” update
Note:
Regular updates of security fixes can prevent vulnerabilities. Use the following command to install/updates only the security fixes. In the below output you can see that we have almost 519 packages are available for updates in the system, out of that it will fetch only “1 patch” belongs the security fix.
$ sudo yum update — security

5. How to remove a particular package?
$ sudo yum remove vsftpd

Note:
Using the above command we can completely erase/delete a particular package from our system. Always be careful before removing any packages and do not give auto-confirmation using ‘-y’ with remove sub-command, as sometimes it may remove the dependencies also and it could lead to the unexpected results for the packages that still required those dependencies. In case if there is any such situation, better you can use ‘rpm -e — nodeps package_Name’ to overcome the dependency issue. In the above output you can see I have completely removed the “vsftpd” package.
6. How to get a combined list of all the packages?
$ sudo yum list all

Note:
With the above command we can get the combined list of information of all the installed and available packages. You can see the differences in the above output.
$ sudo yum list installed

Note:
Here you can get the list of all the information on the packages that are currently installed on the system.
$ sudo yum list installed “http?-*”

Note:
Using the above command we can list all the installed packages that start with “http” It is called double-quoted glob expression, it can be used to list all the versions of some specific components as these are distinguished by numbers.
7. How to find out detailed information about a specific package?
$ sudo yum info vsftpd

Note:
Using the above command we can get detailed information about a particular package like version, release date, size, summary. In the above output, you can see the detailed information about the ‘vsftpd’ package
8. How to clear the cache information from the cache directory?
$ sudo yum clean all

Note:
The above command can use to clear the cached information from our system. By default yum will store all package information in “/var/cache/yum” directory and it uses the system disk space until we clean up the accumulated entries in the cache directory. Sometimes non-clear cached data may cause issues when you attempt to install/update the package or also there is a possibility of showing the wrong version of the package even after the repository has updated packages. Hence it is recommended once in a while to clean up the accumulated entries in the yum cache directory.
9. How to install a group of packages?
Note:
Before use, the ‘groupinstall’ sub-command, let us check the summary of the groups, like how many installed groups, available groups, and available environment groups.
$ sudo yum groups summary

Note:
After finding the summary of group information, let us check the list of available group packages using the following command.
$ sudo yum grouplist

Note:
The above command will list all the available group packages. In the above output I have attached only a few group’s names from the list. Now we can use the ‘groupinfo’ sub-command to get a better idea about the packages that are part of the group.
$ sudo yum groupinfo ‘Basic Web Server’

Note:
As you can see in the above output, the “Basic Web Server” has bundled with three mandatory groups like (base, core, web-server) and other optional groups. If you want to know each of these group package details, then use the ‘groupinfo’ argument with these group names. In our demo, we don’t need the bundled “Basic Web Server” package. Here we are going to install only the webserver, so let’s check the webserver info and install it on our server.
$ sudo yum groupinfo ‘web-server’

$ sudo yum groupinstall ‘web-server’

Note:
Finally, we have installed the group package using the ‘groupinstall’ sub-command. In the above output you can see the name of the installed packages.
10. How to find the package names?
$ sudo yum search samba

Note:
This ‘search’ argument is very useful, for ex: if you don’t remember or don’t know the package name, then you can use the above command to search all the available packages to match with the name you specified.
11. How to install a .rpm extension package using yum?
$ sudo yum localinstall epel-release-latest-7.noarch.rpm

Note:
Sometimes certain packages are won’t be available at our yum repositories, so we may need to download the rpm related package and install it in a traditional method of using rpm installation like “rpm -ivh xyz-1.2.3.rpm” but this package will demand dependencies and those dependencies are available in yum repository, so naturally, first we do install the dependencies using yum command then install the original rpm files. To overcome the dual attempt we can use ‘localinstall’ sub-command to install both dependencies and the rpm package in a single yum command. You can see the details in the above output.
12. How to upgrade the system with the latest releases?
$ sudo yum upgrade -y
Note:
The beauty is we can use both ‘update and upgrade’ sub-command to achieve the latest version of packages in our system, but there is a small difference between them. The ‘upgrade’ sub-command will remove all the obsolete packages during the update of the system whereas ‘update’ doesn’t. You can use the above command only in the same family like if you want to upgrade your version from 7.4 to 7.8, but to upgrade 7.4 to 8.1 then this command is not recommended. To upgrade to a different family better to make a fresh installation of 8.1 OS.
13. How to downgrade a package?
Note:
For a better understanding first I will update “http-parser” package from version (2.7.1–8.el7 to 2.7.1–8.el7_7.2 ), then will do the downgrade sub-command to revert to the original version. Sometimes, there will be compatibility issues with existing applications or hardware after the new updates of few packages, in that case we may force to revert/downgrade those packages into the previous version.
$ sudo yum list installed | grep http-parser

$ sudo yum update http-parser

Note:
Now assume the latest version of the “http-parser” package lead the compatibility issue so we can use the following command to downgrade the version. Now our current version of “http-parser” is (2.7.1–8.el7_7.2) and revert to (2.7.1–8.el7).
$ sudo yum downgrade http-parser-2.7.1–8.el7

Note:
The downgrade sub-command works only based on the availability of the mentioned package (previous) versions in the repository. Using the above command we have reverted the “http-parser” to the previous version. Check the output for your ref.
14. How to view the repository details/information?
$ sudo yum repolist

Note:
Yum comes with both enabled and disabled repositories, by default it will be visible only the enabled repositories. To see both lists then specify ‘all’ like ‘yum repolist all’, also you can use ‘repoinfo’ sub-command.
$ sudo yum repolist all
Output:

15. How to list out the history of yum?
$ sudo yum history OR $ sudo yum history list

Note:
The above command will list out the recent twenty numbers of yum transaction history of the system. It has built with few sub-commands that are added on 3.2.25 version onwards. Using with these sub-commands we can easily recover or rollback malfunctioning packages from the system. Here, I am going to show you the most commonly used sub-commands like “info, redo, undo and rollback”. Let’s see an overview of the 4 sub-commands:
Sub-Command-overview:
Info: It will show a complete detail about a particular transaction or transactions.
Undo: It is used to revert a particular transaction.
Redo: It is used to repeat a particular transaction.
Rollback: This function is also similar to ‘Undo’ but it will revert all the transactions between the specific ID to the current state of the system.
(a) How to get more details about a particular transaction from the yum history?
$ sudo yum history info 10

Note:
In this example, I have taken the transactions ID 10 from the history list of the above output. It shows the ‘ID 10’ was used to install the “bind” package. From the above output you can see the details.
(b) How to undo a transaction?
$ sudo yum history undo 10

Note:
The same transaction ID 10 is going to use in this example also. Using the above command we can rever back the ID 10 to the original state, which means it will remove the “bind” package from the system. Check the above output for better understanding. Also you can use the following command to cross-check whether it is removed or not.
$ sudo yum list installed | grep bind
© How to redo a transaction?
$ sudo yum history redo 10

Note:
The same transaction ID 10 can be used for this example also. Using the above command we can redo/repeat back to the latest state, which means the “bind” package is installed back.
(d) How to rollback transactions?
$ sudo yum history rollback 10

Note:
Rollback is also similar to ‘undo’ but the only difference is it will revert everything between that transaction and the latest state of the system. In this example we will rollback the transaction ID 10, which means it will be removed all the transactions appeared after the transaction ID 10. In the output you can see I was installed all the packages after transaction ID ( dhcp,squid,xchat and the dependencies ) are removed and bind was reinstalled.
WARNING:
Rollback command is not supported to older versions on the following packages:
SELinux
SELinux-policy-*
kernel
glibc and its dependencies like gcc
Thank you for taking the time to read! I hope this article will help you to understand the ‘yum’ command with examples. Drop me your feedback/comments. If you like this article, kindly share it and it may help others as well.
Thank you!
For more Linux Technical Articles : https://www.linuxteck.com/